Edit Your Topic Content
THESE PAGES ARE STILL UNDER CONSTRUCTION AND DO NOT NECESSARELY REFLECT THE CURRENT VERSION OF TÓPICO
In this tutorial, you'll be introduced to editing your topics content in a way that will make it's visual formatting more flexible and consistent.
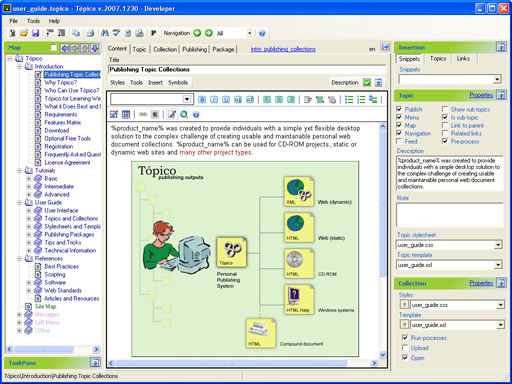
![]() In Tópico you markup your content though the editor's toolbar and styles list. If you're accustomed to work in a traditional WYSIWYG editor, you'll quickly notice that there is no font name, size or any other "truely visual formatting" features in this editor (beside bold, italic and underline).
In Tópico you markup your content though the editor's toolbar and styles list. If you're accustomed to work in a traditional WYSIWYG editor, you'll quickly notice that there is no font name, size or any other "truely visual formatting" features in this editor (beside bold, italic and underline).
This is not an oversight since you'll be creating semantic markup that's automatically written in XHTML by the XStandard editor and formatted during the publishing process. Now don't let this fact disturb you to much since the advantages of this publishing workflow quickly overcome it's perceived limitations. This page at the XStandard web site gives you an overview of the XStandard editor's features.
One of the important things to keep in mind when starting a modern web publishing project is to switch your approach with content from "visual" to "semantic", which is much harder than you think!
This is a vast subject on which you'll find plenty of great articles on the internet so let's just write it this way: Don't focus on how the content "looks like" on the printed (or web) page but on what the content "is" to your collection/publication.
Later in these tutorials, you'll learn about creating semantic styles for your content and will experiment with CSS to format your publication output.

Create simple content
Don't start with all the bells and whistles, you'll have time for this later on! Make sure you create accessible and well structured content in a constant manner. Your audience will thank you for it and you'll be much happier with the results!
Edit your content using simple constructs like paragraphs, bulleted or numbered lists (as appropriate) and tables when the data you need to publish is tabular in nature. Use headings sparsingly and create short topics.
A topic is a unit of information with a title and content, short enough to be specific to a single subject or answer a single question, but long enough to make sense on its own and be authored as a unit. Reference: What are topics?
Structurally, it is a title followed by text and images, optionally organized into sections. Reference:DITA FAQ
:
Use the default XHTML tag set as much as you can, there are tags for quotations, code, abbreviations, and more already built in the standard. Applying those tags is easy with the toolbar buttons and style list that sit at the top of the editor.
Think about the type of each topic you create, try to identify common topic types, try to come up with similar constructs (markup) for similar topics. If you succeed, your content will be much easier to work with.
While you might be accustomed to write a document title at the top of a printed page, don't write the topic title (as a heading 1) at the top of the content in the editor. The title you write in the Title text box will be inserted as the main page heading when your collection is published.
Apply a style to some text using an XHTML standard element
To markup your content, select the text you want to tag and then select one of the common formatting options available in the toolbar or a tag from the drop down list that is found at the upper left of the editor window. The default style list contains the mostly used HTML semantic tags. The Applying styles page in the User's Guide gives a brief description of these tags.
It is suggested that you use only a second level heading (H2) in your topics and abuse other xhtml tags consistantly to improve the uniformity of your collection.
Select an alternate style list to access some custom semantic tags
The Styles button at the top left of the editor window lets you define your own styles that you can associate with your own markup tags. Follow these steps to tag some text in your content as a Warning.
- Select the text block you want to tag as the warning (select a complete paragraph);
- From the style drop dwn list, select ;
- From the popup menu, select .
The text is now framed with a red border and a has different background.
You'll later learn how to modify how Warnings are displayed in your publication.
This paragraph is part of a "Tip" element that's also being used this document. This "Tip" tag is defined in all Tópico stylesheets, each of which could display it very differently.
The Applying styles topic also gives a brief description of the default custom tags available in Tópico.
![]() Because the stylesheet isn't applied entirely in edit mode, some of its format definition will not be rendered when editing. You can use the preview button to visualize what the page will look like when it's published.
Because the stylesheet isn't applied entirely in edit mode, some of its format definition will not be rendered when editing. You can use the preview button to visualize what the page will look like when it's published.
THESE PAGES ARE STILL UNDER CONSTRUCTION AND DO NOT NECESSARELY REFLECT THE CURRENT VERSION OF TÓPICO